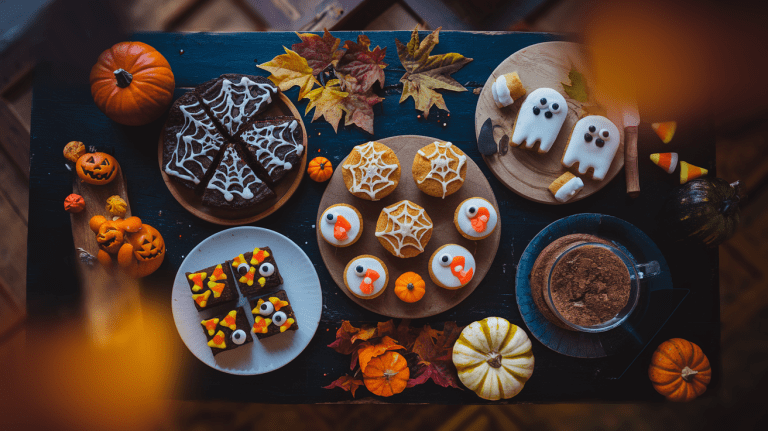
🕸️ Halloween Baked Goods Recipe (Easy Homemade Treats)
So, you want to bake something Halloween-y without turning your kitchen into a scene from a horror movie? Same.
Enter: Easy Homemade Halloween Baked Goods — your ticket to impressing friends, coworkers, or your Instagram followers with spooky-yet-cute treats that taste like pure autumn magic. 🎃✨
No need for fancy piping skills or five-hour frosting marathons here. These recipes are all about fun, flavor, and zero stress. You’ll end up with baked goodies that are festive, delicious, and just the right amount of “creepy cute.”
Grab your whisk, cue up your Halloween playlist (yes, “Thriller” is mandatory), and let’s get baking!
Why This Recipe is Awesome
Because it’s the perfect mix of easy and impressive. These treats scream Halloween — in a fun way, not a “I burned the cookies again” way. 😅

It’s versatile, beginner-friendly, and ideal for parties, potlucks, or last-minute sugar cravings. Think soft cookies, gooey brownies, and cupcakes wearing little candy eyeballs — pure happiness, just with a spooky filter.
Course: Dessert or party snack
Cuisine: Halloween-themed (aka chaos, sugar, and butter)
Difficulty: Easy — you can totally do this
Servings: About 12–15 treats, depending on how much dough you eat raw
Prep time: 20 minutes
Cooking time: 25 minutes
Calories: Let’s call it 200-ish per treat (balance it out with dancing later)
Total time: 45 minutes
Why you’ll love it:
- No weird ingredients — just pantry staples.
- Customizable with any Halloween candy you’ve hoarded.
- Kid-friendly and adult-approved (especially with coffee or a cocktail).
Ingredients You’ll Need
These ingredients cover the base recipe — you can split the dough and customize it for cookies, cupcakes, or bars.

Dry Ingredients:
- 2 ¼ cups all-purpose flour – your trusty base.
- 1 tsp baking soda – so things don’t come out flat.
- ½ tsp salt – because sugar without salt is just chaos.
Wet Ingredients:
- ¾ cup unsalted butter (melted) – makes everything taste better.
- 1 cup brown sugar – for chewiness and depth.
- ½ cup granulated sugar – sweetens your Halloween soul.
- 1 large egg + 1 egg yolk – adds richness and texture.
- 1 ½ tsp vanilla extract – the secret weapon of all good desserts.
Mix-ins (aka the fun part):
- ½ cup chocolate chips – always essential.
- ½ cup Halloween M&Ms – orange, green, purple — go wild.
- ¼ cup candy corn – for that “I tried” festive look.
- Candy eyeballs, sprinkles, or mini Oreos – optional, but they make everything cuter.
Frosting (optional):
- 1 cup buttercream or cream cheese frosting – dyed orange, black, or purple.
- Halloween sprinkles or crushed Oreos – for spooky flair.
Step-by-Step Instructions
Alright, apron on, spooky tunes on — let’s bake. 🕷️

1. Preheat that oven.
Set it to 350°F (175°C) and line your baking trays or muffin tin. This is not the time to “wing it.”
2. Mix your dry ingredients.
In a medium bowl, whisk flour, baking soda, and salt. Easy peasy.
3. Combine the wet ingredients.
In a large bowl, whisk together melted butter, brown sugar, and white sugar. Add eggs and vanilla. Mix until smooth and slightly glossy — you’re halfway to cookie heaven.
4. Combine wet and dry.
Gradually mix dry ingredients into the wet mixture until a dough forms. It should be thick and soft — like edible playdough (which, let’s be honest, you might sample).
5. Add the fun stuff.
Fold in your chocolate chips, M&Ms, and any candy extras. Feel free to get chaotic — Halloween’s about creativity, not precision.
6. Choose your form:
- Cookies: Scoop dough balls onto a tray, flatten slightly, and bake for 10–12 minutes.
- Cupcakes: Spoon into cupcake liners, bake for 18–20 minutes.
- Bars: Spread in a greased pan, bake for 22–25 minutes, and cut into squares once cooled.
7. Cool completely.
Be patient — frosting on warm desserts = disaster.
8. Decorate like a Halloween stylist.
Pipe frosting, add candy eyeballs, drizzle melted chocolate, or go rogue with edible glitter. There are no rules — just make it spooktacular. 👻
Common Mistakes to Avoid
Because even easy recipes can go sideways if you get cocky.
- Skipping the salt: Trust me, salt brings out sweetness — don’t skip it unless you like bland sugar bombs.
- Overmixing the dough: Stir until combined. That’s it. Overdoing it = dense sadness.
- Overbaking: Cookies keep cooking as they cool. Pull them out when the edges are golden and the centers look slightly underdone.
- Decorating too early: Frosting melts faster than your motivation at 3 a.m. Wait until things cool.
- Too many mix-ins: Candy corn melts into sugary puddles if you overdo it. Less is more (for once).
Pro tip: Bake a test cookie first. If it spreads too much, chill the dough for 20 minutes before baking.
Alternatives & Substitutions
This recipe is a total people-pleaser — tweak it however you like.
- Gluten-free? Use a 1:1 gluten-free flour blend. Still soft, still amazing.
- No butter? Coconut oil works (just expect a hint of tropical Halloween vibes).
- No candy? Try white chocolate chunks, nuts, or pretzel bits for a salty-sweet combo.
- Want it darker? Add 2 tbsp cocoa powder to make “midnight cookie bars.”
- Dairy-free version: Use vegan butter and dairy-free chocolate chips — works like a charm.
My favorite hack: Make a “Monster Mash Tray” — spread dough into a pan, bake, then decorate half as spiderwebs, half as mummy faces. Instant variety platter. 🎨
FAQ (Frequently Asked Questions)
Q1: Can I make these ahead of time?
Absolutely! Bake them a day before and store in an airtight container. They actually get chewier overnight.
Q2: How long do they last?
About 4–5 days at room temp (if you don’t eat them all first).
Q3: Can I freeze the dough?
Yes! Roll into balls, freeze on a tray, then store in a bag. Bake straight from frozen — just add 2 minutes to the bake time.
Q4: Do I have to use Halloween candy?
Technically no, but why wouldn’t you want bright orange and purple candy staring at you? Regular M&Ms or chocolate chips totally work too.
Q5: Can I turn this into a cookie cake?
You psychic genius — yes. Press the dough into a 9-inch round pan, bake for 25 minutes, and decorate with frosting once cool.
Q6: Can I skip frosting?
Of course! The cookies taste amazing as-is. But if you’re going for party-worthy presentation, frosting = instant glow-up.
Q7: My cookies spread too much. What gives?
Your butter was probably too warm or the dough too soft. Chill it before baking — it’s worth the wait.
Final Thoughts

And there you have it — the ultimate Halloween Baked Goods Recipe for when you want to bake something fun, festive, and fabulously easy. 🧁🎃
These treats are sweet, soft, and full of Halloween personality — perfect for parties, gifting, or late-night “taste testing.” The best part? You can customize them endlessly — cute ghosts, chocolate spiders, or candy corn chaos — whatever fits your spooky mood.
So grab your mixing bowl and embrace the sugar-fueled spirit of the season. Because let’s be real — Halloween isn’t complete without a little flour on your counter and frosting on your nose. 👻🍪
Now go bake something boo-tiful. You’ve earned it. 💀✨