Halloween Dessert Recipe (Quick & Scary Good)
You know those Halloween desserts that look like something out of a Pinterest fail nightmare? Yeah, this isn’t one of those. This Halloween Dessert Recipe is spooky, fun, and—best part—super easy to pull off, even if your baking skills are somewhere between “I burn toast” and “I can microwave popcorn.” It’s quick, sweet, and just creepy enough to make your guests think you went all out (when in reality, you whipped it up in under 30 minutes).
Why This Recipe is Awesome

For starters, it’s foolproof. You don’t need any fancy baking skills or haunted kitchen tools to make it work. It’s one of those desserts that looks impressive, tastes delicious, and takes almost zero effort. Think of it as the costume party of desserts—playful, over-the-top, and a total crowd-pleaser.
Plus, it’s customizable. You can make it chocolaty, creamy, fruity, or even slightly horrifying (edible eyeballs, anyone?). And it’s perfect for all kinds of Halloween events—kids’ parties, movie marathons, or just when you want to eat something festive while watching Hocus Pocus for the fifth time this week.
Course: Dessert
Cuisine: Fun, spooky, and sweet
Difficulty: Easy enough for the living and undead
Servings: 8–10 people
Prep Time: 15 minutes
Cooking Time: 10 minutes (tops)
Calories: Around 200 per serving
Total Time: 25 minutes
Ingredients You’ll Need
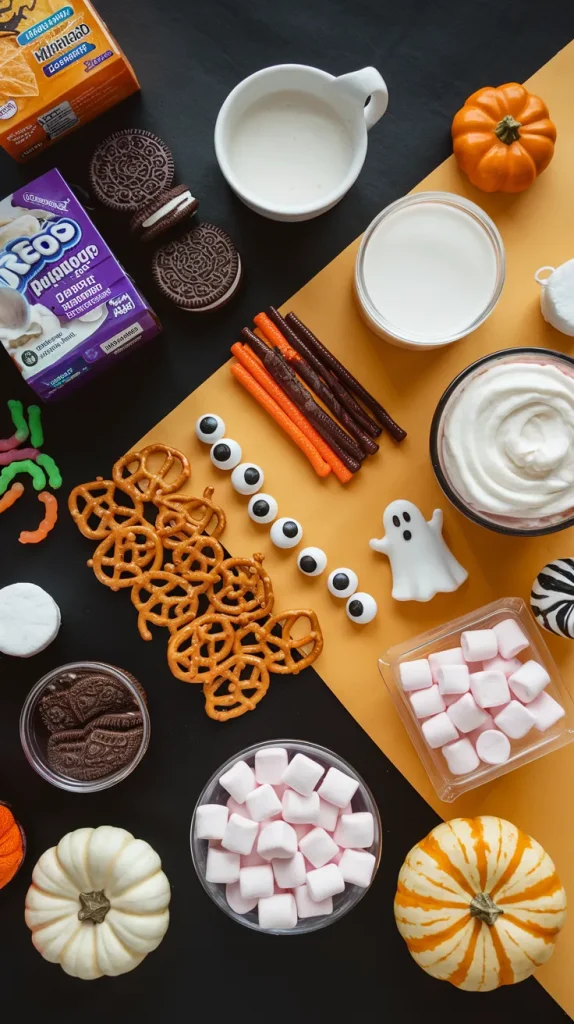
- 1 package of chocolate sandwich cookies (Oreos, because duh)
- 2 cups whipped topping (store-bought or homemade—no judgment)
- 1 box instant chocolate pudding mix
- 2 cups cold milk
- ½ cup crushed pretzels or graham crackers (for that “grave dirt” effect)
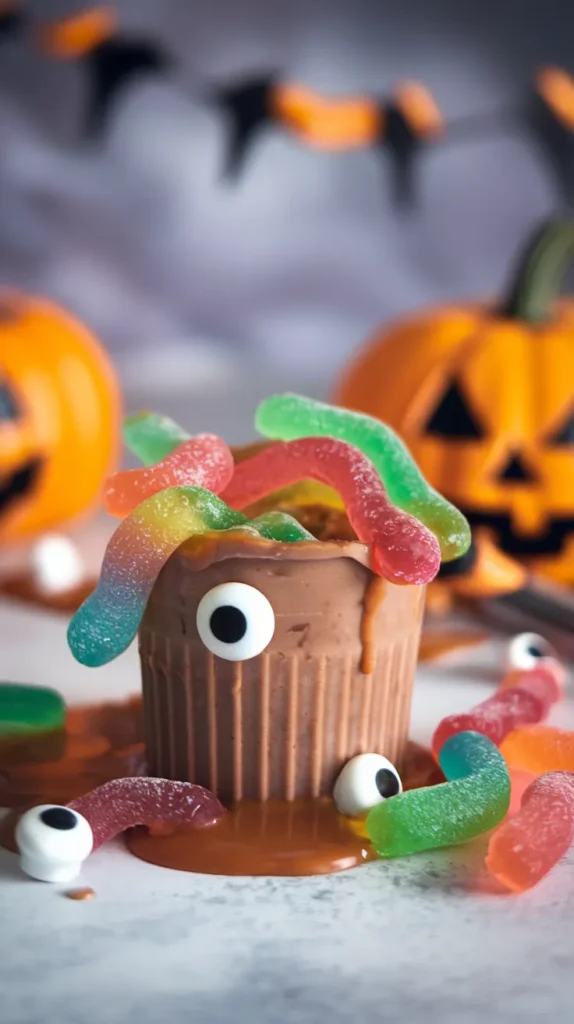
- Candy eyes, gummy worms, or Halloween sprinkles for decoration
- Optional: ½ cup mini marshmallows or candy corn for extra spookiness
Pro tip: Go wild with the decorations! The uglier and more chaotic, the better. It’s Halloween—perfection is overrated.
Step-by-Step Instructions
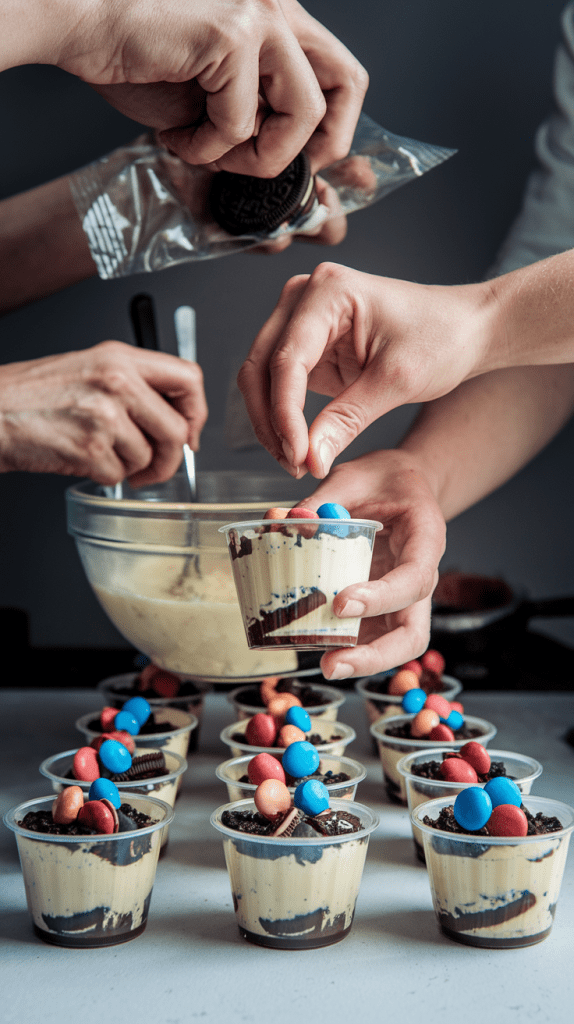
- Crush the cookies. Place your Oreos in a ziplock bag and crush them using a rolling pin (or a can of pumpkin if you’re multitasking). You want a mix of fine crumbs and a few chunky bits for texture.
- Make the pudding base. In a mixing bowl, whisk together the pudding mix and milk until smooth. Let it sit for 2–3 minutes until thickened.
- Add the whipped topping. Fold in the whipped cream gently until you have a silky, mousse-like texture. Try not to eat all of it straight from the bowl (no promises).
- Assemble the layers. In a large glass dish or individual cups, start layering—pudding mix, crushed cookies, a sprinkle of crushed pretzels or grahams, and repeat. You want that layered “graveyard” look.
- Add decorations. Stick in a few gummy worms like they’re crawling out of the “dirt,” add candy eyes, marshmallows, or broken cookie “gravestones.”
- Chill before serving. Let it sit in the fridge for at least 15–20 minutes before serving so everything sets nicely.
Optional: Drizzle with chocolate or caramel sauce for a dramatic horror-movie finish.
Common Mistakes to Avoid
- Over-mixing the pudding. It’ll get too thin and lose that luscious, creamy texture. Whisk gently and stop when it thickens.
- Not chilling it. This dessert needs a quick chill to firm up—otherwise, it’ll look more like a Halloween soup than a spooky treat.
- Using too much topping. I get it, whipped cream is life. But too much makes it overly fluffy and less rich.
- Forgetting the crunch. The crushed cookies or pretzels give it that satisfying texture. Skipping them = regret.
- Under-decorating. Don’t be shy! The more chaotic and creepy, the better. Gummy worms hanging out? Good. Marshmallow ghosts screaming? Even better.
Alternatives & Substitutions

- Pudding flavor swap: Try vanilla or butterscotch pudding for a twist, or mix both for a candy-corn-inspired vibe.
- Dairy-free: Use almond milk and coconut whipped cream—it’s just as good and totally vegan-friendly.
- Healthy(ish) version: Cut the sugar by using sugar-free pudding mix and light whipped topping. You’ll still get all the flavor without the sugar coma.
- Want something baked? Turn this into mini dirt cupcakes! Use chocolate cupcakes as your base, frost with pudding mix, and top with cookie crumbs and candy.
- Add some crunch: Sprinkle toasted nuts or granola between layers for an unexpected bite.
Personal favorite combo: Chocolate pudding, Oreos, and peanut butter cups. It’s Halloween—go big or go home.
FAQ (Frequently Asked Questions)
1. Can I make this ahead of time?
Yes! You can assemble it up to a day in advance. Just keep it chilled and add decorations right before serving so they stay fresh.
2. How long does it last?
About 3–4 days in the fridge—if it lasts that long. Mine’s usually gone by morning.
3. Can I make this gluten-free?
Totally. Use gluten-free cookies or crushed rice cereal instead of Oreos, and you’re set.
4. Can I use homemade pudding?
Sure, but why? Instant pudding is faster, easier, and tastes just as good once you load it with candy.
5. What can I serve this in?
Anything! A trifle bowl looks fancy, but plastic cups or mason jars work great for parties. Even a Halloween cauldron for extra drama.
6. Can I make it kid-friendly and adult-friendly at the same time?
Absolutely. Keep one batch PG for the kids, and spike the adult version with a splash of Baileys or coffee liqueur. Best of both worlds.
7. What’s the best garnish?
I vote for gummy worms, candy eyes, and a light dusting of crushed Oreos on top—it’s spooky-cute perfection.
Final Thoughts

This Halloween Dessert Recipe is proof that festive food doesn’t need to be complicated to be scary good. It’s fun, fast, and ridiculously customizable. You can make it look spooky, silly, or straight-up disgusting (in the best possible way).
So grab your pudding mix, unleash your inner mad scientist, and start layering! Whether you’re making it for a party or just a late-night treat while watching scary movies, it’s guaranteed to impress.
Pro tip before you go: Make extra. Trust me—this dessert disappears faster than Halloween candy on November 1st.