6 Halloween Candy Recipes That Are Easy & Fun 🍬🎃
Okay, confession time: I love Halloween, but mostly for one reason — candy. Forget the jump scares, fake cobwebs, or over-the-top costumes. The real thrill is sneaking another piece of chocolate when no one’s looking (don’t pretend you don’t do it too).
But this year, instead of raiding the store-bought candy aisle like a sugar-crazed zombie, why not make your own? Yep, homemade Halloween candy recipes that are ridiculously easy but look like you spent hours crafting them.
These six recipes are spooky, sweet, and seriously fun to whip up — whether you’re throwing a party, entertaining kids, or just making treats because, well, you deserve it. Ready? Let’s get sugar-high together. 😏
1. Monster Bark 🍫👁️
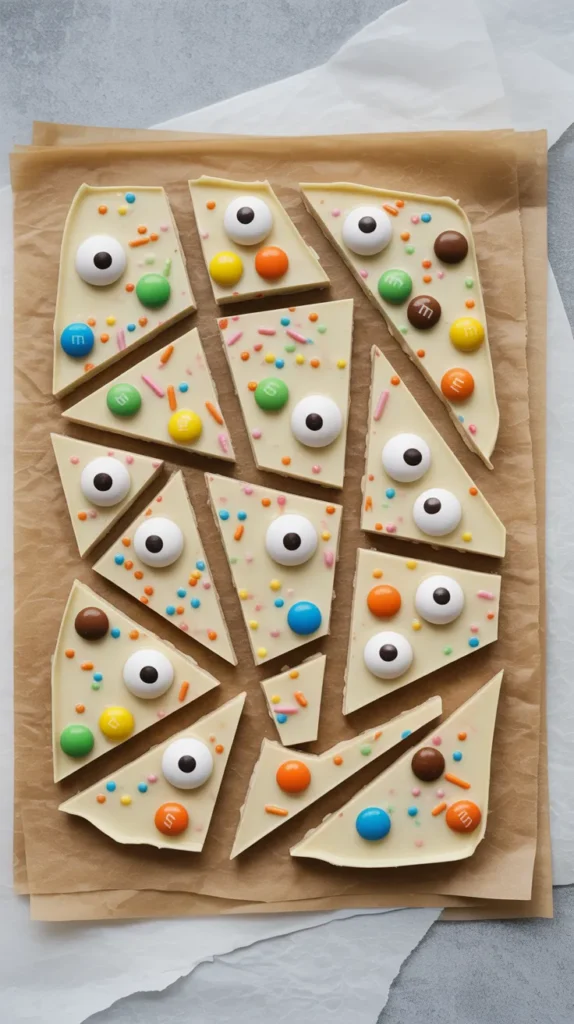
This one’s a total Pinterest star — colorful, creepy, and almost too pretty to eat (almost). Think of it as a mash-up between art project and chocolate heaven.
Why It Rocks:
It takes 10 minutes and zero baking skills. You literally melt chocolate, decorate it, and let it harden. That’s it.
You’ll Need:
- 2 cups white chocolate chips
- Halloween sprinkles (orange, purple, black — the whole spooky rainbow)
- Candy eyes (because everything looks better when it’s staring back at you)
- Mini M&Ms or Reese’s Pieces
How to Make It:
- Melt the white chocolate in 30-second bursts in the microwave until smooth.
- Spread it out on parchment paper in a thin layer.
- Sprinkle candy eyes, M&Ms, and Halloween sprinkles on top while it’s still soft.
- Chill for 30 minutes, then break into random pieces.
Pro Tip: Swirl in a little melted dark chocolate before decorating for that marble effect. It looks fancy — and no one needs to know it was accidental. 😏
2. Witch’s Brew Popcorn Balls 🧙♀️🍿
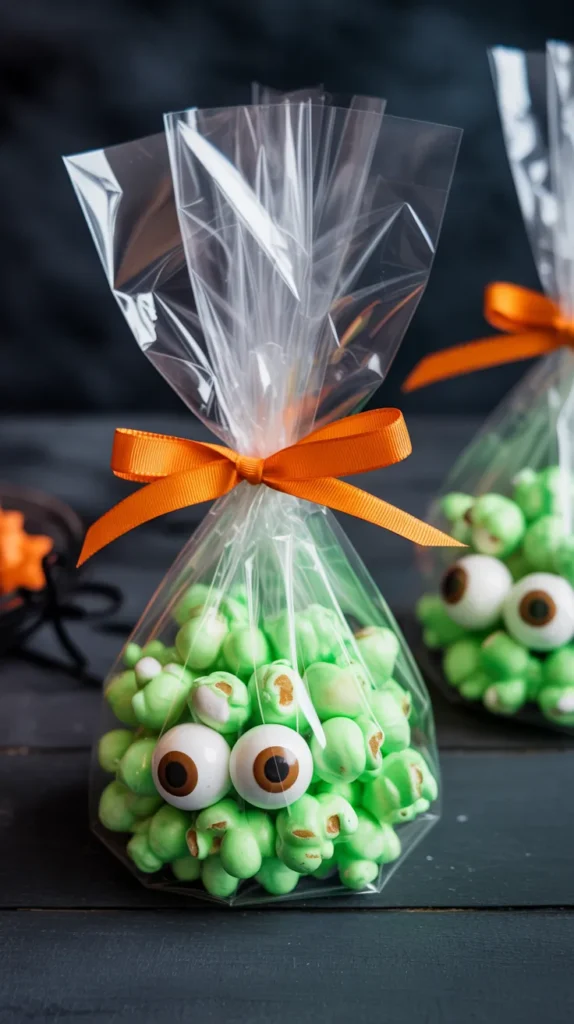
If popcorn balls had a spooky glow-up, this would be it. These sticky, sweet, and crunchy treats are equal parts nostalgic and chaotic — which basically sums up Halloween.
Why You’ll Love It:
They’re a crowd favorite, especially when dyed neon green and sprinkled with edible glitter. Plus, they double as decor (if you can resist eating them).
You’ll Need:
- 8 cups popped popcorn
- ½ cup butter
- 4 cups mini marshmallows
- Green food coloring
- Candy eyes or gummy worms
How to Make It:
- Melt butter in a large pot, then stir in the marshmallows until melted and smooth.
- Add food coloring (a few drops for light green, more for “radioactive witch” green).
- Stir in popcorn until coated.
- Let it cool slightly, then shape into balls with greased hands.
- Press in candy eyes or worms while still tacky.
Pro Tip: Wrap them in clear plastic and tie with orange ribbon — instant party favors that make you look way more organized than you are.
3. Peanut Butter Spider Cookies 🕷️🍪
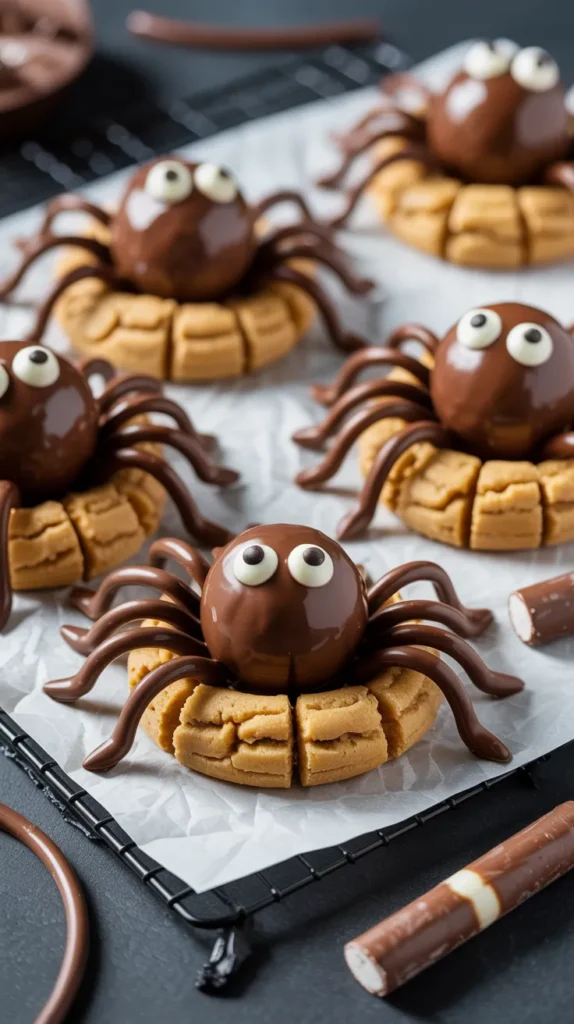
If you’re a peanut butter lover, prepare yourself — these spider cookies are as adorable as they are delicious. And no, they don’t actually contain spiders (you’d be surprised what people Google).
Why They’re the Best:
They use a peanut butter cookie base topped with a chocolate truffle “spider body” — and those little candy eyes? Unbeatable cuteness.
You’ll Need:
- 1 batch peanut butter cookie dough (store-bought or homemade)
- Chocolate truffles (like Lindor or Ferrero)
- Melted chocolate for legs
- Candy eyes
How to Make It:
- Bake peanut butter cookies and let them cool slightly.
- While still warm, press a chocolate truffle into the center.
- Pipe on eight chocolate “legs” using a small piping bag or zip-top bag with the corner snipped.
- Stick candy eyes on top.
Pro Tip: Use mini Reese’s Cups instead of truffles for a chunkier spider. The result? Slightly less realistic, way more snackable.
4. Candy Corn Fudge 🍬🧡
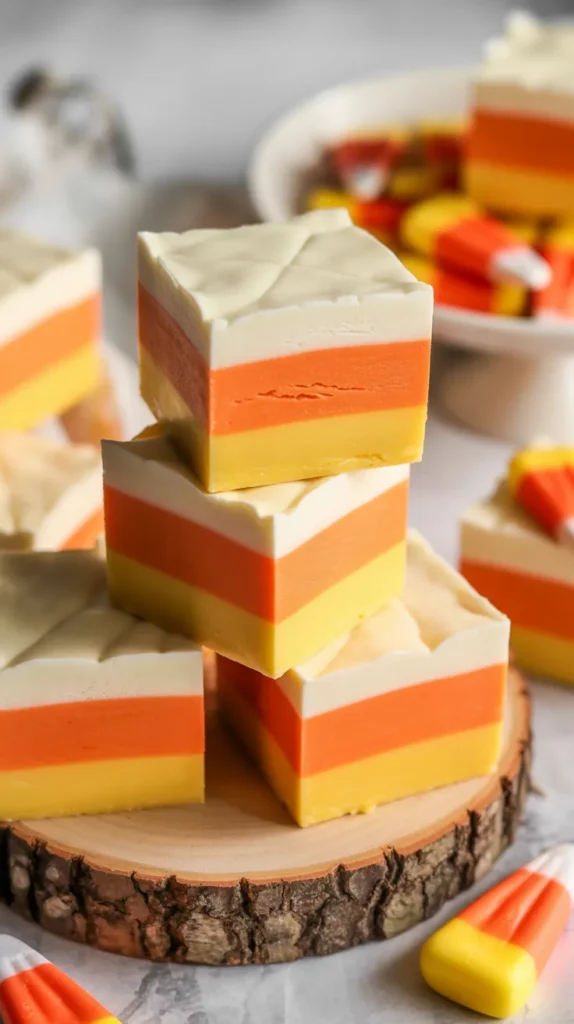
Love it or hate it, candy corn is the Halloween candy. But if you’re not into the waxy texture (no judgment), this fudge recipe gives you the flavor and color — minus the chewiness.
Why You’ll Love It:
It’s creamy, colorful, and looks like a candy corn gradient dream. Perfect for gifting or impressing your dessert table guests.
You’ll Need:
- 3 cups white chocolate chips
- 1 can (14 oz) sweetened condensed milk
- Orange and yellow food coloring
- 1 tsp vanilla extract
How to Make It:
- Line a square pan with parchment paper.
- Melt the white chocolate and condensed milk together until smooth.
- Divide the mixture into three bowls: leave one white, tint one orange, and one yellow.
- Layer yellow, orange, and white fudge in the pan, smoothing each layer before adding the next.
- Chill for 2–3 hours, then slice into squares.
Pro Tip: Sprinkle crushed candy corn on top before it sets for extra texture (and major Halloween vibes).
5. Chocolate-Covered Pretzel Bones 💀🥨
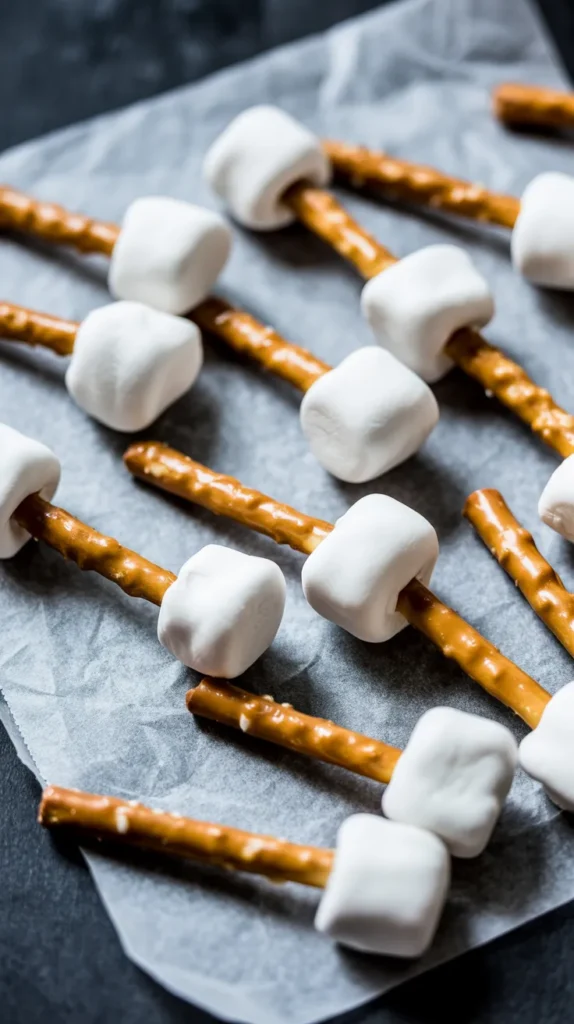
Sweet, salty, and spooky — the holy trinity of Halloween snacking. These pretzel bones are freakishly easy but look straight out of a bakery display.
Why You’ll Love It:
They take five minutes, taste amazing, and make you look like a Pinterest parent without the meltdown.
You’ll Need:
- Pretzel sticks
- Mini marshmallows
- White chocolate or candy melts
How to Make It:
- Stick a mini marshmallow on each end of a pretzel stick (these are your “bones”).
- Dip the entire pretzel into melted white chocolate.
- Lay on parchment paper and chill until firm.
Pro Tip: Drizzle a little extra white chocolate over the top for that “bone texture.” It’s weirdly satisfying.
Want to make them scarier? Add a few cracks with dark chocolate once they set — broken bones never looked so tasty. 😈
6. Mummy Rice Krispie Treats 🧻🩷
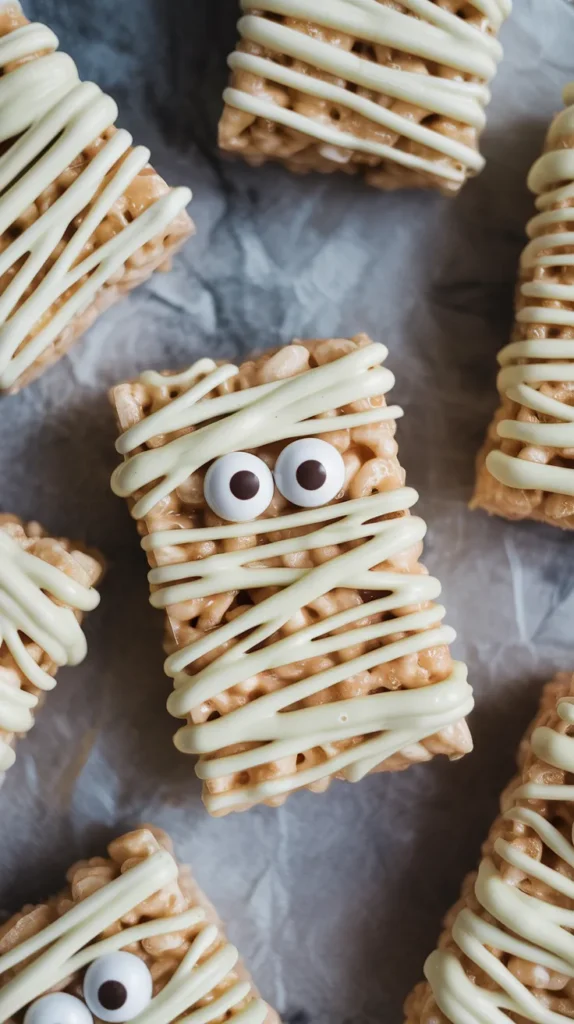
These are classic, cute, and almost too easy. It’s basically the beloved Rice Krispie treat — just dressed up in a Halloween costume.
Why You’ll Love It:
They’re no-bake, kid-friendly, and ridiculously fun to decorate. Plus, the “mummy wrap” icing hides all your frosting mistakes. Win-win.
You’ll Need:
- 1 batch Rice Krispie treats (cut into rectangles)
- White candy melts or white chocolate
- Candy eyes
How to Make It:
- Dip each treat halfway into melted white chocolate.
- Let them set slightly, then drizzle more chocolate back and forth with a spoon for the “mummy wrap.”
- Add two candy eyes while it’s still wet.
Pro Tip: Mix up your mummies — use dark chocolate for “evil mummies” or orange for “pumpkin mummies.” Variety = personality. 😉
Bonus Idea: Leftover Candy Bark 🍫🍬
Got too much leftover Halloween candy (or raided your kid’s stash)? This one’s the ultimate “lazy genius” recipe.
Simply melt chocolate, spread it on parchment, and top with chopped candy bars, pretzels, or sprinkles. Chill, break into pieces, and boom — you just upcycled sugar into even more sugar. Efficiency at its finest.
Decorating & Packaging Tips for Extra Fun 🎁
Want your candy creations to look like they came straight from a bakery (or at least not like a crime scene)? Here are some easy hacks:
- Use parchment paper: Always. No one likes sticky cleanup.
- Add edible glitter or luster dust: Instantly makes your treats sparkle like Halloween magic.
- Go crazy with packaging: Clear treat bags, orange ribbons, black twine — presentation sells the illusion of effort.
- Mix and match textures: Sweet + salty + crunchy = the perfect bite.
- Label them with funny names: “Frankenstein Fudge” or “Witch Fingers” never fail to make people smile.
Common Candy-Making Mistakes to Avoid 🍭
Even easy recipes can go sideways — here’s how to dodge disaster:
- Overheating chocolate: Melt it low and slow. Burnt chocolate smells like sadness.
- Skipping parchment paper: You’ll regret it when your treats stick like cement.
- Using too much food coloring: A little goes a long way unless you want radioactive green snacks.
- Not letting candy set long enough: Patience, my friend. Chill time makes the magic happen.
- Forgetting portion control: Okay, this one’s unavoidable. Just embrace it.
FAQ (Because You Know You’re Wondering) 💭
Q: Can I make these ahead of time?
Absolutely. Most of these keep for 3–5 days in airtight containers. Just keep chocolate ones away from heat (melty monsters aren’t cute).
Q: Can kids help make them?
Yes! These recipes are super kid-friendly — just handle the melting for them unless you enjoy cleaning sticky marshmallow off your ceiling.
Q: How do I store leftover candy?
Room temp in airtight containers is perfect. Avoid the fridge unless it’s humid — condensation = sticky mess.
Q: Can I use candy melts instead of chocolate?
Totally! Candy melts are easier to work with and come in wild colors. Perfect for spooky themes.
Q: Can I make these vegan or allergy-friendly?
Yep. Use dairy-free chocolate, vegan marshmallows, and nut-free toppings. The flavor stays killer.
Q: What’s the easiest one to start with?
Monster Bark — it’s basically melting chocolate and throwing stuff on top. You can’t mess that up (I’ve tried).
Conclusion: Sweet, Simple, and Spooky AF 🍭🎃
So there you have it — 6 Halloween candy recipes that are easy, fun, and guaranteed to make you the star of spooky season. Whether you’re crafting cute mummy treats or eerie chocolate bones, each one delivers that perfect mix of festive and delicious.
Remember: Halloween baking doesn’t need to be fancy — just fun, messy, and loaded with sugar. So tie on your apron, crank up “Thriller,” and make something that’ll wow your guests (and your sweet tooth).
Now go ahead and embrace your inner candy witch — your cauldron awaits. 🧙♀️🍬✨